

A Grand Tactical Approach to Naval Wargaming
The problem with naval wargames on a tabletop is the table. Specifically, the table edges. No matter how large or small your table is, at some point you run up against the edge of the world. With a land battle this isn't so much of a problem, since generally there are certain key locations that need to be taken or held in order to determine the victor, but at sea it makes no sense to fight over a small patch of water. Sea battles are fluid affairs, often running fights, and they don't end as soon as one side crosses some imaginary boundary.Inspired by two seminal books - Paul Dunn's Sea Battle Games primarily, but also Paul Hague's Sea Battles in Miniature - I decided to experiment with a system of map movement, and allow the table to 'scroll' around the map as the action moves.
The Scenario
In the summer of 1886 the old rivals Britain and France find themselves at war with each other because... colonial stuff... reasons... hand wave... mumble. A French squadron is bottled up in the Brest roadstead by a significantly stronger British force under the command of Admiral Spiffington. The French Admiral Désespéré is ordered to break out by his government. He tries to protest at the futility of such an attempt, (his ships are generally older, slower and weaker than Spiffington's), but is told he will be stripped of his command if he doesn't comply immediately.To add to Désespéré's woes, all the coastal fortresses and batteries that are dotted around this coastline are unmanned. The Coastal Gunner of the Year Award ceremony was held last night and all the crews are nursing hangovers due to their over-enthusiastic consumption of the free champagne and calvados. In other words I didn't want to complicate things, and trying to find out exactly where and what the coastal fortifications in the area were at the time proved beyond ordinary Google-level research. This was just a proof of concept experiment, but I think a better scenario could be constructed where, in the absence of solid historical data, you could allow the French player to place a selection of standardised fortifications/batteries around the shorelines. This would force the British player to deploy his blockading forces further out.
So at 6am in broad daylight Désespéré's ships weigh anchor and move out through Le Goulet. His squadron is accompanied by torpedo boats and coast defence ships which will attempt to screen the main force till it can escape, and then return to harbour.
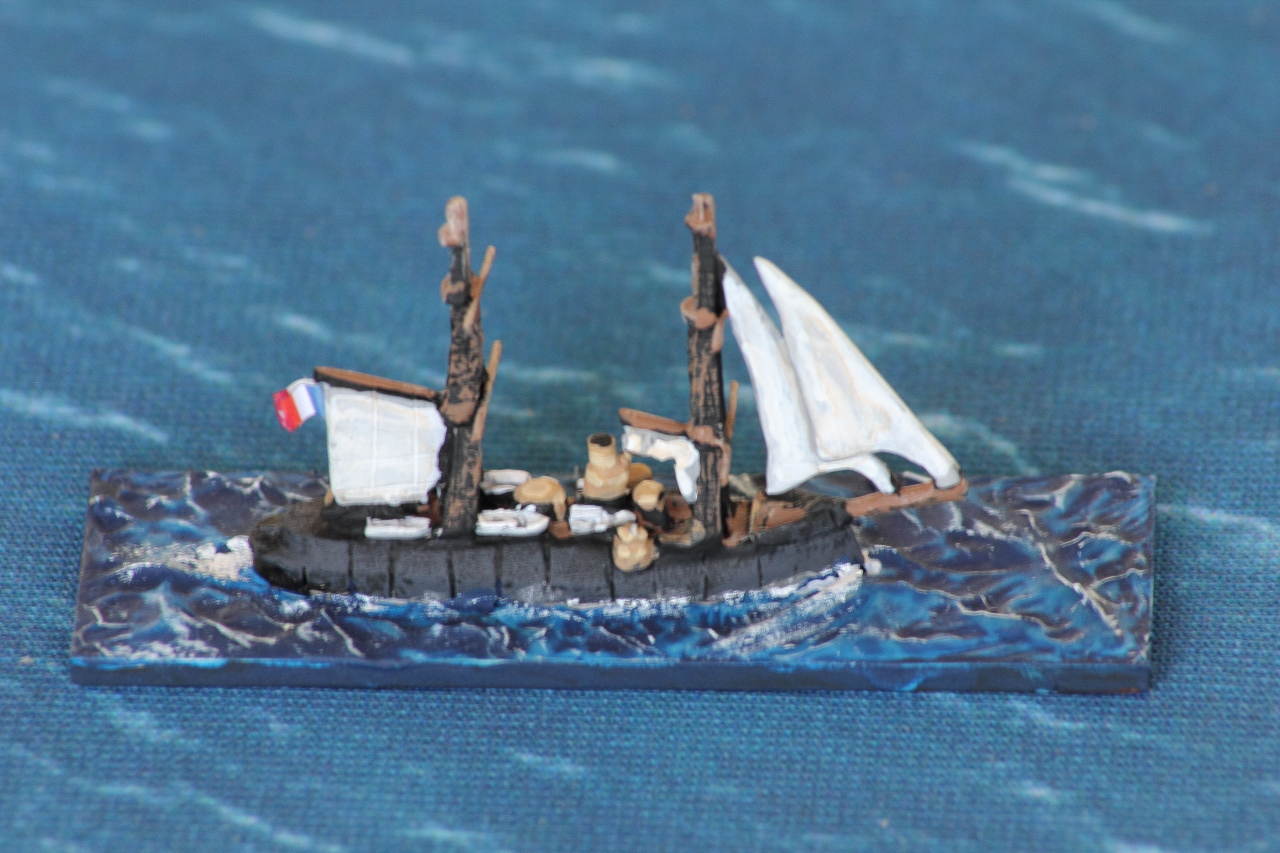
The Ships
All these models are from Tumbling Dice's 1/2400 Victorian range. I've adapted them slightly by replacing the sails with yards made from wire (bits of guitar string) wherever possible. I also replaced the metal bases with 2mm MDF. In case you want to do a scenario similar to this one, all but one of the ships here come from TD's starter packs. The codes you need are:
- ASV MSP14
- ASV MSP15
- ASV MSP16
… and the one other ship, the Shah - ASV127
I'd actually recommend you get some extra French ships too, to make it a little less unbalanced. Perhaps one extra each of the Colbert and Courbet, both of which had sister ships. Those 4 ships could then be the main breakout force, given that they have a speed of 15kts and therefore a fighting chance of getting away, and the other slower ships could be relegated to the 'coastal squadron'.
Main Force:
Ocean - central battery ship, 13kts:

Courbet - central battery ship, 15kts:

Colbert - central battery ship, 15kts:

La Galissonière - central battery ironclad, 12kts:

Coastal Squadron:
Tonnerre - breastwork monitor, 13kts:

Cerbère - armoured ram, 12kts:

Bombe & Couleuvrine - torpedo gunboats, 18kts:

8 torpedo boats, 17-19kts:


British
Main Force:
Temeraire - central battery/barbette ship, 14kts:

Alexandra - central battery ironclad, 15kts:

Inflexible - masted turret ship, 14kts:

Ajax - turret ship, 13kts:

Conqueror - turret ram, 14kts:

Dreadnought - turret ship, 14kts:

Devastation - turret ship, 14kts:

Scouting Force:
Shah - unarmoured iron frigate, 16kts:

Rattlesnake & Grasshopper - torpedo gunboats, 19kts:

The Tactical Rules
I've had trouble finding a decent set of rules for the 1880s. It tends to be too late for ironclad rulesets, and too early for the pre-dreadnought era. The best, or at least the most enjoyable, that I've tried are Fire When Ready written by David Manley and published by A and A Games. They're designed for the pre-dreadnought age but they do allow you to stat up ships using older armour and gun types. They're a good solid low/medium complexity set of rules, and fast playing once you get the hang of them.
My only real beef with FWR is that when you hit a ship with gunfire there is no armour penetration roll unless you get a critical hit. This means that small calibre guns which wouldn't be able to penetrate the target's armour can still chip away at even the most heavily armoured ship. It's a reasonable bit of streamlining for the pre-dread era, but I'm not sure it works so well in the 1880s where you have unusual armour configurations, e.g. central battery designs.
At the end of the day though, nobody really knows how these ships would have fared against one another, and in practice these rules deliver a good narrative and seem to produce fairly plausible results.
The only tweaks I made were:
Weather - I toned down the rather chaotic weather system by only making the weather roll every 30 minutes (i.e. once every Operational Turn).
Movement - if you are moving a ship and it is going to overlap one of your ships that hasn't moved yet, you may elect to move the other ship at the same time. The other ship may not declare a ramming attack if moved in this way. When you have several ships in line astern this may cause a cascade effect - if for example the rearmost ship in your line has an initiative die of 1, you will most likely end up moving your entire line at once.
In order to remember which ships have moved I have a system. When first placing the initiative dice they're placed next to the bow of their respective ships. After each ship moves, its die is placed at the stern. As each ship fires its die is removed - this just makes it easier to see at a glance who is still to fire, and leaves the table free of dice at the end of the gunnery phase.
Rangefinders - I make the assumption that there are no optical rangefinders in this period and that gunnery is mostly conducted over open sights. So all ships suffer the -2 modifier to the On Target roll. The best way to do this is to bake the -2 into the On Target Table, by adding 2 to all the numbers, so e.g. Long Range would be 17+ instead of 15+.
I used the range brackets unchanged, but in hindsight I think they need to be reduced quite a bit. The next time I do an 1880s game I will be trying this modified 'On Target' Table:
Extreme 60-100 20+
Long 40-60 17+ (Maximum range for large calibre MLRs and guns 6" or smaller)
Medium 20-40 12+
Close 0-20 8+
The Maps
I ended up with 2 levels of map, an overall operational map to plot 30 minute turns and a grand tactical map to chart off-table ships at the normal FWR 3mins per turn. The basic concept is to generate the grand tactical map and the tabletop terrain as and when they're required, rather than trying to map out large areas that might not end up getting used. Think of it as computer game software, where only the stuff you can see is rendered.
To be honest, for this simple scenario I think it would have been fine just to use a single A3 grand tactical map, but it's still nice to have another map of the wider area, to help visualise the context.
To be honest, for this simple scenario I think it would have been fine just to use a single A3 grand tactical map, but it's still nice to have another map of the wider area, to help visualise the context.
The main operational map printed on A4:
 |
| Note the official Naval Wargames Pencil. It is of course illegal under the 1876 Naval Wargames Act to use any other type of pencil when playing. |
Each small square represents 30cm (1ft) on the table. The ground scale in FWR is 1cm=100yds, so a square is 3000yds. My table at this time was a woefully small 120cm/4ft square. I wouldn't attempt it again on a 4x4, I really think the minimum you need is 6x4 or preferably 6x6, but it was just about do-able, albeit a bit of a pain in the backside at times. So my table represents an area on this map of 4x4 squares or 12,000 yards.
Apologies if the rest of this post is a confusing information dump, you can skip it and go straight to the next post if you like, since in this game Operational movement turned out to be pretty irrelevant! Both sides sighted each other immediately. I'm posting it here mostly for my own reference and it's a very much a work-in-progress. It's not as confusing as it sounds in practice!
I had a system of movement where you paid movement points to move either straight or diagonally. I thought I was being clever, but it turned out to be a bit rubbish so I won't go into it. In future I'll simply work the operational map and time scales in such a way that I can say 1mm on the map = 1 knot of speed or something equally convenient.
So forgetting about the rubbish gridded movement system, the basic prototype idea for a 2 player game without an umpire is this:
Operational Movement:
Draw a diagram of the cruising formation of each squadron, showing the relative position of each ship. You may specify different formations for different sections of your route.
Each player draws their squadrons' routes on their own copy of the map, marking speed and formation changes. The maximum cruising speed for Inactive squadrons is 0.7 x max speed of slowest ship, rounded to the nearest whole number.
Instead of plotting a direct route, you can specify a patrol. Draw a line or polygon on the map and mark the speed.
Both players now combine both their maps into one master map. The smart way to do this is the classic Paul Dunn method: Player A plots directly on the map. Player B overlays a sheet of tracing paper on their copy of the map and plots on that. Place Player B's tracing paper layer on Player A's map.
All squadrons start Inactive. While Inactive they must move along their pre-plotted routes, complying with any speed or formation changes.
A squadron becomes Active when it sights an enemy ship, or when it is within signal range of any friendly Active ship. All ships in an Active squadron may now deviate from their pre-plotted route, moving freely at any speed up to their maximum.
When any enemy squadron comes within sighting distance of any part of a patrol route, determine the position and direction of the patrolling squadron on
its route randomly. (Designate regularly spaced intervals along the
route and then roll an appropriate die). If the patrolling squadron is
within visibility range of the enemy squadron they both become Active.
If not, the patrolling squadron remains on the map Inactive and will be
moved along its patrol route each turn.
If you have a friendly Active squadron within signal range of a patrolling squadron, you have the option of determining the patrol's position using the same method as above. You are not obliged to. If the patrol is found to be within signal range of any active squadrons, it becomes Active.
Grand Tactical (Off Table) Movement
When the first sighting is made, make a larger scale Grand Tactical Map on squared or graph paper of the surrounding area, copying any coast line etc. (This will be explained in the next post).
Consult your formation diagrams and mark the positions of all the ships within Active squadrons, even if some of those ships are not yet visible. (This is a bit unrealistic, but the alternatives are too problematic).
Mark the positions of all Inactive squadrons, but not the individual ships within them. They will continue to move according to their plot in each Tactical Turn. Once they become active you reveal the individual ships. Note that the marked position of an Inactive squadron that is Activated marks the point of whatever the nearest ship is, usually the lead vessel(s), so it's a little bit vague. Use common sense!
The scale of the GT map needs to relate directly to your tabletop, so for FWR I used 1mm on the map = 1cm on the table.
Estimate the time at which contact was made and make a note of it. So if say the contact occurs about 1/4 of the way through the 06:00 Op Turn, and we're using 30 min Op Turns and 3 minute Tactical Turns, then the time is about 06:06. (Rounded to the nearest 3 mins)
Every Tactical Turn keep a note of the time and move all ships/squadrons normally. At each hour and half hour you do an Op Turn, including a weather check.
When plotting movement on the GT map for a group of ships in line astern, it's usually best just to plot the lead ship.
When plotting movement on the GT map for a group of ships in line astern, it's usually best just to plot the lead ship.
Any squadrons that are too far away to be marked on the GT should be left at the start of their Op Turn. e.g. in the above example they would remain at their 06:00 position. When you get to 06:30 off map squadrons move on the Op map, and if they enter the GT map, they then move on the GT map every 3 min Tactical Turn as normal.
As soon as you can draw a table-sized border around any opposing ships, you deploy the models on the table.
For Fire When Ready rules - any ships that enter the table are given an initiative die of 1 (for the gunnery phase).
Tabletop Movement
All ships on table move first. Then plot the off table ships on the GT map.For Fire When Ready rules - any ships that enter the table are given an initiative die of 1 (for the gunnery phase).
Playing Solo
This is a system that lends itself nicely to solo play. Obviously you won't need to have multiple copies of the Op Map. You just plot both sides on the same map, which is what I'm doing for this experiment.You could for example set all of one side to patrol mode and plot the other side's as direct routes. Depending on the objective you might be trying to avoid the patrols, e.g. a blockade like this scenario, or find them e.g. hunting for merchant raiders.
If you're still with me then your brain is probably hurting a bit by now, but don't worry there are pretty pictures in Part 2.
No comments:
Post a Comment